Showing posts with label make stuff. Show all posts

Saturday, February 22, 2014

Hobby knife refill from Japan... ingenious!


Picked this up from Daiso in SoCal over break.  It's like a $1 store except it's Japanese and everything is $1.50.  And since it's Japanese, everything has a touch of quality or uniqueness or cuteness or utility to it which makes shopping there super addicting.  

Check out this hobby knife re-fill.  It's got a slot for storing your used blades.  MIND BLOWN.  It fills such an obvious and logical need when replacing blades, it just makes sense, you wonder why you don't see that here.  The second item is glue tape, kinda like double sided tape, but in a dispenser like white-out tape.  Neat!  I got it for paper-crafting, since i make a lot of papercraft terrain perhaps this will make it faster.   Can't wait to try it!

Saturday, March 19, 2011

Homebrew Shurro chess set

Shuuro is this sweet new chess alternative game I wanted to try out but given my poor grad student status I couldn't afford the $80 price tag for the 2-player base + 4-player expansion.  Really, the first thought you get when you see this is why don't people just make it themselves?  So I set out to do just that and saved $40, but that's because i scored a sweet ebay deal for 7 chess sets.  W/ithout Ebay, most likely the cheapest you can possibly build this for is ~$50.  Yeah, that's right, you need 7 chess sets for 4 player set, 5 chess sets for 2 players.  Is it worth saving $30 to spend time making it yourself?  Read on and find out!

Monday, December 6, 2010

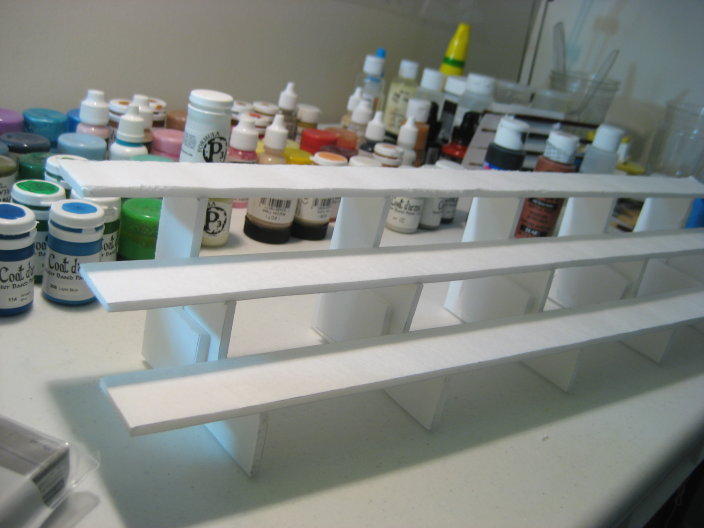
DIY Paint Rack


Made myself a paint rack out of foam board + hot glue, very easy, probably took about an hour.  Shelves are 3.5cm deep (size of my largest paint pot (Reaper Pros), and craft paint bottles), and 3cm tall per step.  5 support struts over 20inch length.  3 steps for 4 rows (counting the ground row).  Looks great and it was free!
Fully populated.  most of my metallic paint not here since they aren't used often.

Thursday, September 30, 2010

DIY Banana Ice Cream

This is the level of stiffness i prefer.  More like ice cream.
So i tried out this recipe recently for DIY banana ice cream. Guess what the ingredients are? that's right! BANANA's! and nothing else! Seriously. It's a pretty sweet dessert you can whip up and enjoy guilt-free. However, the recipe page said they used a food processessor, which i don't have. Thus begun my quest to see if it could be made with something less than a food processor.

Tuesday, August 31, 2010

Working with Chipboard

Basing with chipboard hex tiles. I ended up spackling the foam hills to cover up the ugly cellular grain.
Ah! Nothing like a game of Mechwarrior to look forward to, to get you making terrain again! I have figured out my terrain-making strategy: before i kept thinking i should design my terrain to fit both 1" square (for Star Wars Minis) and 2" hex (for Mechwarrior) maps and then getting stuck cause the base size and scale is different and whatnot. But it turns out there are a slew of great 1" square grid maps for star wars gaming with lots of features, so it doesn't really need terrain, except for doors because being able to to tell if they are open or not visually helps. Whereas with Mechwarrior, they don't have lots of good 2" hex maps. So it makes sense to just make terrain for them. Here is where chipboard comes in.

Saturday, August 21, 2010

DIY Lady Gaga's Disco Stick

Top: Reference pic.  Bottom: our version with Lady Linda Gaga ;)   I think our discostick is better haha!
It's good to have engineering buddies. Last Halloween a friend of mine wanted to go as Lady Gaga, so my engineering buddy Tim and I said, hey, let's make her Lady Gaga's disco stick! Why? BECAUSE WE CAN. And so we did. And it was Awesome! Words and pictures just can't really capture how sparkly the sucker turned out to be. With 11 ultra-bright white LEDs and tons of arcylic vase-filler gems it was quite something to behold. Note, this is based on her first disco stick from her Love Game music video.

Sunday, July 18, 2010

DIY Foam Swords, Part 2: Playtest and Improvements

The 12 foam swords used for the playtest, mostly intact!
Hahaha! So four of us went to the park the other day just to try out the foam swords. Of course we brought some extra swords along (to duel wield and whatnot) and some nerf guns. But then the kids in the park kept coming up to us wanting to play too! Eventually, we had outfitted pretty much all the kids in the park with foam swords and we starting running "missions" like capture the flag (waterbottle) from the fort and escort the VIP from one end of the park to the other. Oh man, it was a blast! At one point we had at least 16+ kids out there whopping and hollaring and dueling it out on the grass (we need to get a picture of this!). We even got a group of highschoolers who were watching/chilling on the side to join in. All-in-all an excellent playtest with a wide test population, which lead to improvements in the foam sword design. Read on to see how to make the swords better!

Saturday, July 17, 2010

DIY Foam Swords, Part 1: Construction

Here's my take on foam practice swords, which are more commonly known as boffers. They are basically foam insulation or pool noodles with a pvc pipe core. Since you can find plenty of boffer construction articles online, i will be focusing on the design options which make it suitable for martial arts practice. Also, my approach is minimalist, what is the minimum work/materials needed to make it because i am making 23 foam swords for a group battle. The material cost per sword is ~ $3 making it cheaper than official martial arts practice swords or nerf swords (at least $15)

Wednesday, July 14, 2010

Qual-line Skateboard Upgrade Review

This is a bit departure from the usual maker stuff i post but there aren't a lot of reviews on this on the internets, so here are my two cents. If you don't know what Quad-line is it's basically replacing the the skateboard wheels with roller-blade wheels which are larger and softer, which equates to a smoother ride. I thought i'd give it a shot! Read on for the review!

Saturday, May 15, 2010

Blue LED-Candle Birthday Cake

Look at it!  Just look at it!  So beautiful.....
Pure awesome! I have the best of friends who made this for me. 30 bright BLUE LEDS hot glued into straws, wired up to a driver circuit, then manually poked through the bottom of the cake! Man, it must've taken some planning and time to make this! The whole thing was powered by six 9-Volt batteries! All lead-free solder a plus (no one wants to die from eating their birthday cake).

A toy fan was connected to a PIC microcontroller, which controlled the flicker of the LED candles! Blowing on the fan triggered a mechanical switch, which was counted by the microcontroller and turned off the LEDs. If you didn't blow long enough, the candles would turn back on like those trick candles that keep re-lighting!

Pretty sweet (Literally). My buddy Erik is going to put an Instructable on this soon, i'll link to the post when it goes up!
The aftermath ...took me 30 min to clean...a mess of wiring and cake bits everywhere!
Definitely among the most memorable birthday cakes ever! My graduate school friends come up with the best birthday cakes hahahaha. Here's the one Linda made for me couple years ago. Anime girl drawn in Frosting!

Friday, April 9, 2010

DIY Figurine Display Case


I needed an acrylic display box for my anime figurines and i thot it would be cheaper to make my own.

What you'll need:
* 11x17" acrylic sheet (2) $3.57 x2 = $7.14
* sharp razor blade/knife
* metal straight edge (ruler)
* self-healing mat
* Legos

I bought a plastic sheet cutter ($3) but it turns out it was nothing special and a razor blade knife would've done the same job. Just make sure it's sharp and has a nice handle. So really the cost is only the acrylic sheets since the other stuff i already had.

I decided to split the sheet right down the middle for a box height of 5.5" and make a width of 4" for the side pieces (length 17-4 = 13"). In retrospect, it would've been easier to make both the box height and width 5.5" because then the front/back and top/bottom would be the same size and there would be less cuts to make. It's pretty easy to cut acrylic sheets, basically you score a line and then break the sheet across a hard edge.

I needed a frame to make sure my walls were 90 degree angles from each other and the table, so i borrowed a trick from casting plaster and used Legos to build an inner and outer brace to align each corner. A bead of hot glue along the outer edge. Repeat x3 more times for each corner. The 4 walls should be fairly free-standing now. Then I hot-glued the outer edges that were previously covered by the Lego frame. Use a spot of hot glue for each inner corner to secure the top to the sides of the box. Done! (the bottom piece doesn't need to be glued to the box).
I'll probably use some brush-on Crazy glue (cyano-acetate glue) to fill in the cracks between the top and sides if i want to make it air-tight.

Is this worth doing? Well, if you can find your display box for $8 or less, you might as well buy it. Otherwise, the DIY approach lets you customize the box size and it's actually pretty easy to do.